Pages

October 6, 2010

Chicken Parmesan

This is a go-to dinner for us. It is very easy and comes together rather quickly.


Chicken Parmesan

Chicken:
4 Boneless, Skinless Chicken Breasts
1 ½ C. Italian Bread Crumbs
¼ C. Grated Parmesan
1 Tbsp. Oregano
1 Tbsp. Basil
1 Tbsp. Garlic Powder
1 C. Flour
2 Eggs

Marinara:
2 (15 oz) Cans Hunts Tomato Sauce
1 tsp. Sugar
1 tsp. Oregano
1 tsp. Garlic Powder
¼ C. Grated Parmesan

Finishing:
1 ½ C. Shredded Mozzarella
1 lb. Pasta

Preheat the oven to 450°F.

Put the chicken breasts side by side on a cutting board and lay a piece of plastic wrap over them. Pound the chicken breasts with a flat meat mallet (or the bottom of a heavy saucepan), until they are about 1/2-inch thick.

Put the flour in a shallow bowl and season with a fair amount of salt and pepper; mix with a fork to distribute evenly. In a wide bowl, beat the eggs until frothy. Mix the bread crumbs, parmesan, oregano, basil, and garlic powder in a third bowl.

Lightly dredge both sides of the chicken cutlets in the seasoned flour, and then dip them in the egg wash to coat completely, letting the excess drip off, then dredge in the bread crumbs.


Heat olive oil over medium-high flame in a large oven-proof skillet. When the oil is hot, add the cutlets and fry for 4 minutes on each side until golden and crusty, turning once.


Meanwhile, combine the marinara ingredients.

Fill the bottom of a baking dish with one half of the tomato sauce. Place the cutlets on top of the sauce. Ladle the remaining tomato sauce over the chicken and sprinkle with mozzarella.


Bake for 30 minutes or until the cheese is bubbly and the internal temperature of the chicken reaches 165°F for 15 seconds.

Serve over pasta.

Cinnamon Rolls

I generally detest cinnamon, with only one exception – cinnamon rolls. I think that it may have something to do with the copious amounts of icing that typically drowns out most of the cinnamon taste.

When I saw this recipe, the maple icing intrigued me, and was a big factor in why I chose to make it with my standard cinnamon rolls. If you wanted to stick with the more traditional vanilla icing, simply omit the coffee and replace the maple flavoring with vanilla extract.

This makes a lot of cinnamon rolls, so unless you are going to a large event or plan on giving them away, you may want to halve (or even quarter) the recipe. A full recipe results in forty rolls.


Cinnamon Rolls

Rolls:
4 C. (32 oz) Cold Water
2 ½ Tbsp. (1.65 oz) Instant Yeast
22 ¾ C. (5 lbs) Bread Flour
6 ¼ C. (20 oz) Cake Flour
1 C. (4 oz) Powdered Milk
5 ½ tsp. (1 oz) Salt
1 ¾ C. (12 oz) Sugar
2 C. (16 oz) Butter, Well Softened
10 Eggs
2 tsp. Cardamom

Filling:
2 C. Brown Sugar
2 Tbsp. Cinnamon

Maple Frosting:
2 lb. Powdered Sugar
2 tsp. Maple Flavoring
½ C. Milk
¼ C. Melted Butter
¼ C. Brewed Coffee
⅛ tsp. Salt

Mix the dough ingredients together on low speed for approximately 6 minutes until a smooth dough is formed. Allow the dough to rise for 1 ½ hours, covered in a lightly oiled bowl.

When the dough has risen, punch it down. Cut the dough in half, and set one half aside. Roll the dough out into a 24x32 rectangle, or smaller if needed.


Brush the surface with melted butter. Sprinkle half of the filling mixture evenly on top of the dough. Roll-up tightly to form a 32" long jelly roll.


Crimp the edges when finished rolling. Cut into 1 1/2" pieces. Repeat this procedure with the remaining dough.


For individual rolls: Grease a high-sided baking pan. Place the cut rolls 2" apart on to the greased pan. Making sure each roll is evenly spaced. Press down on each roll to slightly flatten. Cover with plastic wrap, and allow to rise for 45 minutes.

For pan rolls: Grease several high-sided cake pans. Place the cut rolls evenly spaced, but not touching, into the greased pans. Press down on each roll to slightly flatten. Cover with plastic wrap, and allow to rise for 45 minutes.


Bake at 350F degrees for 25 minutes, until golden brown.

For the frosting, mix together all ingredients listed and stir well until smooth. It should be thick but pourable. Taste and adjust as needed. Generously drizzle over the warm rolls.


Source: Icing adapted from The Pioneer Woman Cooks (Ree Drummond)

June 6, 2010

Chicken & Rice Casserole

I actually saw this recipe in a Campbell’s soup ad. The picture looked really good, so I used their recipe as the basis for mine. It is a super quick and easy dinner that has plenty of leftovers for Tim’s lunch the next day.


Campbell’s Chicken & Rice Casserole

2 (10 3/4 ounce) Cans Campbell's Cream of Potato Soup
2 2/3 C. Water
2 C. Uncooked Long-Grain White Rice
3-4 C. frozen mixed vegetables
1 tsp Thyme
4 Boneless Skinless Chicken Breast Halves
1/2 C. Shredded Cheddar Cheese
Stir the soup, water, rice, and vegetables in a 9" x 15" shallow baking dish.


 Top with chicken. Sprinkle the chicken with the thyme. Season with salt and pepper as desired. Cover.


 Bake at 375 degrees for 45 minute or until done. Top with cheese.


Adapted from Campbell's Kitchen

May 26, 2010

Doughnuts

Doughnuts have always been on my “to-do” list, but I was always a bit intimidated. After surviving making bagels, I figured that the time had come to take on the challenge.

A few helpful hints:

1)      Do not let the shaped doughnuts rise for more than the 1-1 ¼ hours. The first time that I made these, I used the theory of “the longer something has to rise, the bigger and airier it will be.” Apparently, this recipe has a rather short breakdown period. I let the doughnuts rise for about 2 ½ hours and they ended up being rather deflated. They tasted fine, but they were rather unattractive and flat.The second batch rose for only an hour and they were much prettier.

2)      If you are using plastic wrap to cover the shaped doughnuts as they rise, please make sure that it is generously greased. There is nothing as disheartening as getting ready to fry beautiful airy doughnuts, and to have the tops pull off and completely deflate when you pull the covering off.

The second, prettier batch.
Yeast Doughnuts

For the Doughnuts:
1-⅛ C. Whole Milk, Warm
¼ C. Sugar
2-¼ tsp. (One Package) Instant Or Active Dry Yeast
2 Large Eggs, Beaten
10 Tbsp. Unsalted Butter, Melted
4 C. All-Purpose Flour
¼ tsp. Salt
Canola Oil

For the Glaze:
3 C. Powdered Sugar
½ tsp. Salt
½ tsp. Vanilla
½ C. Cold Water Or Milk

To Make the Dough:


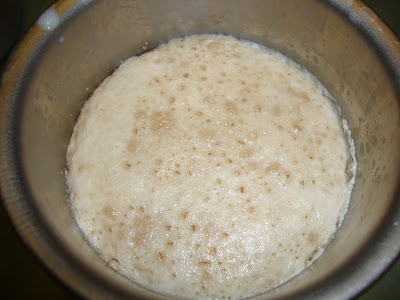
Make sure milk is nice and warm, but not overly hot (105-115°F).Add sugar to milk. Stir to dissolve. Add yeast into a small bowl. Pour milk/sugar mixture over yeast. Stir gently, then let sit for 10 minutes.
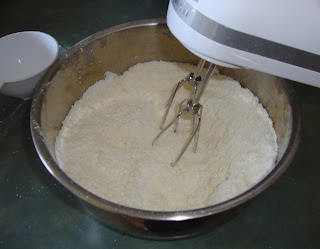
This should be done with the dough hook attachment, not the whisk. I realized this after I took the picture and didn't remember to get updated pictures.
 Melt butter in separate bowl until almost melted. Stir to finish melting so butter won’t be overly hot. Add beaten eggs to melted butter, stirring constantly to make sure that the eggs don't cook. Add the egg/butter mixture to the bowl of an electric mixer fitted with the dough hook.

The yeast gets all foamy and happy after 10 minutes.
 With the mixer on 3 (if you have a KitchenAid) or medium-low speed, pour in the yeast mixture. Allow the dough hook to stir this mixture for a couple of minutes, making sure that it is thoroughly combined.

With the mixer still going, add helpings of the flour mixture in 1/4 to 1/2 cup increments until all the flour is gone. Stop the mixer, scrape the bowl, and then turn the mixer on the same speed for five whole minutes.

After five minutes of kneading, you should have a soft, but not overly sticky dough.
 After five minutes, stop the mixer and scrape the bottom of the bowl. Turn on the mixer for 30 seconds. Turn off the mixer and allow the dough to sit in the bowl undisturbed for 10 minutes.

After 10 minutes, transfer dough to a lightly oiled bowl. Toss the dough to coat, and then cover the bowl with plastic wrap and place straight in the fridge. Refrigerate dough for at least 8 hours, or overnight.

To Make the Doughnuts:

The next day, the dough is reminiscent of airy sugar cookie dough.
Remove bowl from fridge and turn out dough onto a lightly floured surface. Roll out to 1/4 to 1/3-inch thickness.
If you do not have a 3-inch or 1-inch round cutter, feel free to use other shapes. The back of a piping tip is also a good substitute. 
Using a 3-inch cutter, cut as many rounds as you can, then roll out remaining dough and cut as much as you can, etc. Cut holes out of each round using a 1 1/2-inch cutter.
Before rising, the doughnuts look similar to sugar cookie cut-outs.
Place both doughnuts and holes on a floured baking sheet. Cover with large tea towel or greased plastic wrap and place in a warm place in your kitchen.
If not allowed to rise for too long, the doughnuts should be nice and fluffy prior to frying.
 Allow doughnuts to rise undisturbed for at least 1 hour; 1 hour 15 minutes if necessary. Doughnuts should be visibly puffier and appear to be airy.

To Fry the Doughnuts:

Heat plenty of canola oil in a large pot until the temperature reaches 375- 380°F —do not let it get hotter than 380! 375 is ideal; keep the thermometer in the pan to continually monitor.


One to two at a time, gently grab doughnuts and ease them into the hot oil. Allow them to cook 1 minute on each side; they will brown very quickly. Remove doughnuts from the oil with a slotted spoon, allowing all oil to drip off.


Place doughnuts immediately on several layers of paper towels. Count to five, then flip it over onto a clean part of the paper towels. Count to five, then flip it over again; the purpose, obviously, is to drain as much grease as possible before it soaks into the doughnut. Repeat with remaining doughnuts and holes. The holes will cook more quickly than the doughnuts; about 30 seconds per side. Allow doughnuts to slightly cool.

To Glaze:

Mix all glaze ingredients in a bowl until completely smooth. One by one, dip doughnuts into the glaze until halfway submerged. (Note: completely submerge doughnut holes, and then remove with slotted spoon). Remove from glaze, then turn right side up on a cooling rack over a cookie sheet (to catch dripping glaze). Serve warm if possible, or room temperature.


Sandwich Bread

Once I saw this recipe, I knew that I had to make it. It makes a wonderful tall loaf of bread that is soft, but sturdy enough to hold up a sandwich. After getting the hang of the original white bread, I started to experiment by adding a tablespoon of garlic powder and oregano to the dough to get an “Italian” version.

We have not bought bread since I discovered this recipe. I’ve been making two to three loaves a week.


American Sandwich Bread

3 ¾ C. All-Purpose Flour
2 tsp. Salt
1 C. Warm Whole Milk (about 110°)
1/3 C. Warm Water (about 110°)
2 tbsp. Unsalted Butter, Melted
3 Tbsp. Honey
1 Envelope (about 2 ¼ tsp.) Instant Yeast

Adjust an oven rack to the lowest position and heat the oven to 200°. Once the oven temperature reaches 200°, maintain the heat for 10 minutes, then turn off the oven.


Mix 3 ½ cups of the flour and the salt in the bowl of a stand mixer fitted with the dough hook. Mix the milk, water, butter, honey and yeast in a 4-cup liquid measuring cup. Turn the machine to low and slowly add the liquid. When the dough comes together, increase the speed to medium and mix until the dough is smooth and satiny, stopping the machine two or three times to scrape dough from the hook, if necessary, about 10 minutes. (After 5 minutes of kneading, if the dough is still sticking to the sides of the bowl, add flour 1 tablespoon at a time and up to ¼ cup total, until the dough is no longer sticky.) Turn the dough onto a lightly floured work surface; knead to form a smooth, round ball, about 15 seconds.


Place the dough in a very lightly oiled large bowl, rubbing the dough around the bowl to coat lightly. Cover the bowl with plastic wrap and place in the warmed oven until the dough has doubled in size, about 40-50 minutes.


On a floured work surface, gently press the dough into a rectangle 1 inch thick and no longer than 9 inches.


With a long side facing you, roll the dough firmly into a cylinder, pressing with your fingers to make sure the dough sticks to itself. Turn the dough seam-side up and pinch it closed.


Place the dough seam-side down in a greased 9×5-inch loaf pan and press it gently so it touches all four sides of the pan. Cover with greased plastic wrap; set aside in a warm spot until the dough almost doubles in size, 20-30 minutes.

Keep one oven rack at the lowest position and place the other at the middle position and heat the oven to 350°. Place an empty baking pan on the bottom rack. Bring two cups of water to boil in a small saucepan. Pour the boiling water into the empty pan on the bottom rack and set the loaf onto the middle rack. Bake until an instant-read thermometer inserted at an angle from the short end just above the pan rim into the center of the loaf reads 195°, 40-50 minutes. Remove the bread from the pan, transfer to a wire rack and cool to room temperature. Slice and serve.


Source: Baking Illustrated

May 25, 2010

Easter Baskets

I was in charge of dessert for Easter dinner, and I wanted to do something different. I had recently seen the butterfly cupcakes in Hello Cupcake! and it gave me the idea to make chocolate egg adornments. I had also recently acquired molds for dessert shells that I was looking for an excuse to use. After much deliberation, I decided that peanut butter pie would be nice in the shells, like a large peanut butter cup. I had a horrible time trying to find a recipe for peanut butter pie that didn’t include whipped cream, so I altered Grandma Gator’s cream pie recipe. The end result seemed to be a hit – Tim’s Grandmother ate two!


Easter Baskets (Peanut Butter Pie in a Chocolate Shell)

Supplies Needed:
Dessert Shell Mold (My molds are two piece sets)
Wax Paper
Plastic Baggies
Roll of Paper Towels
Toothpicks
Offset Spatula
Chocolate Chips
Various Colored Candy Melts

Peanut Butter Pie “Grass”:
½ C. Sugar
1/3 C. Flour
¾ tsp. Salt
2 C. Milk
3 Egg Yolks
2 Tbsp. Butter
½ C. Peanut Butter
1 tsp. Vanilla
Green Food Coloring

To make the “Baskets”:

Melt 1 ½ cups of the chocolate chips in a double boiler or microwave until melted and over 105° on a candy thermometer. Stir in ½ cup of chips until the temperature enters the tempering range (88°-90° for dark chocolate and 86°-88° for milk chocolate).

Fill each outer mold 1/3 to 1/2 full with melted chocolate. Insert the inner mold and press into place. Lightly tap the molds to break up any air bubbles. Put the molds into the refrigerator or freezer until completely set.


Once set, remove the dishes from the molds (it may help to quickly run warm water over the bottom of the molds to loosen the dishes). Store in refrigerator.

To make the decorations:

Draw the handle template on a piece of paper. Cut out squares of wax paper large enough to fit each handle.

Place about 1 cup of chocolate chips in a plastic bag. Microwave in 10 second intervals, unsealed, massaging the chips in between, until the chocolate is completely melted and no lumps remain. Press out the excess air in the bag and seal. Push the mixture down to one corner of the bag and snip off a very small corner. Trace the outline of the handle template.


Fill in the outline, being generous, so that it will spread all the way to the sides.


Using an offset spatula or a toothpick spread and smooth the chocolate.

The chocolate sets quickly, so each handle should be on a separate piece of wax paper, in order to prevent breaking and cracking.  
Wrap the handles around a roll of paper towels that is the approximate width of the baskets. Put into the refrigerator or freezer until completely set.

Repeat this process until you have enough handles for all your baskets.
While the handles are setting, draw an egg template on a piece of paper. Cut a large sheet of wax paper for the eggs. Place about 1/2 cup of each colored candy melts in separate plastic bags. Microwave in 10 second intervals, unsealed, massaging the candy melts in between, until the candy is completely melted and no lumps remain. Press out the excess air in the bag and seal. Push the mixture down to one corner of the bag and snip off a very small corner. Trace the outline of the egg template with the various colored melted candy. Use the same bag of colored candy melts to fill in the outline. Be generous, so that it will spread all the way to the sides. Using an offset spatula or a toothpick spread and smooth the candy.

The melted candy will begin to cool and harden as you work. If it becomes too stiff to work with, microwave for 10 more seconds until melted again. This step is very important – if you think you might need to reheat the candy, definitely do it. You will save yourself a lot of messed up eggs by keeping the candy melted.
Repeat this process with more candy melts until you have enough eggs for all your baskets. Let set completely.


Once the eggs have set, use the other colored candy melts to decorate the eggs. Let set completely.

To make the filling:


Mix sugar, flour, and salt. Add enough milk to make a paste, and then add the egg yolks. Pour on the remaining milk and cook in a double boiler for 15 minutes, stirring constantly until thick and smooth. Remove from heat and stir in the butter, peanut butter, vanilla, and food coloring.

I forgot a coupler, so I had to cheat by pushing the decorating tip into the bottom of the pastry bag.
Allow to cool slightly and transfer to a pastry bag fitted with a star tip. Pipe into the prepared chocolate baskets, and then garnish with the chocolate handles and Easter eggs.


Serve immediately or store in refrigerator.

April 24, 2010

Homemade Pizza

Tim and I both love pizza. It is our go-to easy dinner idea. Whether it is hand tossed, thin crust, or a calzone, we love it.

I had looked for a long time and had tried several other recipes (with varying degrees of failure), before finding this one. It has a nice flavor and rises nicely. The amount of flour can vary significantly with each batch. Each time that I have made it, I have used a different amount of flour; from 2 to 2 ½ cups.


Basic Pizza Dough
3/4 C. Warm Water or Flat Beer (105-115°F)
4 tsp. Sugar
1 Tbsp. Olive Oil
1/2 tsp. Salt
1 tsp. Active Dry Yeast
2 to 2 1/4 C. Bread Flour


Heat water in microwave until temperature reaches 105-115°F. (If the water is too hot, it will kill the yeast). Sprinkle the yeast onto the surface of the water and stir in until dissolved. Add sugar and stir in a teaspoon of flour; set aside for 5 minutes. The mixture should begin to bubble. If the mixture doesn't bubble, either the yeast is too old or the temperature of the water was too hot and you should start over again with fresh yeast or cooler water.

After the yeast begins to bubble, add it to the remaining ingredients in the bowl of an electric mixer (or other large bowl). Knead on low speed for 15 minutes or turn out onto a clean work surface which has been dusted lightly with flour and knead for the same amount of time.

The dough should feel slightly sticky when you are done kneading, but it shouldn't cling to your hands. If it does, knead in a few dustings of flour. If the dough doesn't feel slightly sticky, there's not enough moisture; knead in a few drops of water.

Tip: To hydrate the dough just a little, soak a paper towel with water and wrap it lightly over the dough ball and leave it to rest for 5 minutes, then knead the extra moisture into the dough.

Exact measurements for the quantities of flour and water are never accurate since one batch of flour will absorb more or less water than another based upon storage and harvesting methods, age of flour and the type of wheat, the way in which the flour is milled, the weather, and a number of other conditions. Each time the dough is prepared is unique, but experience will teach you the proper consistency.

When the dough is smooth and elastic it is ready to begin the rising phase.

Place a few drops of olive oil at the bottom of a large heavy bowl. Place the rounded dough ball in the bowl and turn to coat the mass lightly with oil; this prevents the dough from forming a crust which would keep it from rising fully. Cover the bowl with plastic wrap or a clean, damp cotton towel and place in a warm place, free from draft. (Inside an oven, on top of a refrigerator or hot water heater are good spots if they are draft-free).

Allow the dough to rise, undisturbed until it has nearly doubled in bulk. This can take 60-90 minutes, depending on the yeast and room temperature.

At this point, the dough may be punched down (deflated - the air bubbles pressed out) and stretched to form a pizza crust and used immediately (or it may be sealed tightly in freezer bags and frozen for later use; defrost in microwave for 5-7 minutes or allow to sit at room temperature for 1-2 hours before using).

When ready to bake, set the baking rack in the oven to the lower or lower-middle rack and set the oven temperature to 475°F. Allow oven to preheat for at least 20 minutes. If available, a pizza stone may be set in the oven for a crisper crust.


While the oven preheats, stretch (don't roll) the dough out to a 14 inch diameter circle (or much wider if you prefer even thinner pizza crusts). The dough may be pressed out on a work surface and transferred to an ungreased pan (sprinkle a little cornmeal or semolina flour into the pan to prevent sticking, or spray lightly with olive oil spray). Another method is to press the dough directly into the pan. Or if you're feeling adventurous, stretch the dough out by holding it over the backs of two upheld hands, turning and allowing the dough's weight and gravity to stretch it out (they use a variation of this method in pizza shops to make the famous "hand stretched" dough).

Top with preferred toppings, such as sliced fresh peppers, mushrooms, onions, pepperoni, anchovies, cooked Italian sausage, etc. Sprinkle with a few hot red pepper flakes (according to taste) and salt and pepper. Feel free to experiment with toppings of your choice, varying the quantity and type of sauce or cheese. You may also brush the crust with garlic butter to add some additional flavor.

Bake for approximately 15 minutes or until crust is golden brown.


Source: Cooks.com

Irish Car Bomb Cake

In keeping with the Irish theme of my Dad’s birthday dinner, I had to make this cake. It is amazingly rich and moist and I want the buttercream on everything that I eat from now on.

Although I could not taste the Guinness in the cake, it really brought out the flavor of the chocolate. I happen to like Bailey’s, so I used a heavy hand for the frosting, but this can be adjusted to taste. The below recipe makes just enough icing to frost the two cakes, so if you would like to add decorative piping, you will want to increase the ingredients.


 Irish Car Bomb Cake

Ingredients:

For the Guinness Chocolate Cake:
1 C. Stout (Guinness)
1 C. Unsalted Butter
¾ C. Unsweetened Cocoa Powder
2 C. All-Purpose Flour
2 C. Sugar
1½ tsp. Baking Soda
¾ tsp. Salt
2 Large Eggs
2/3 C. Sour Cream

For the Ganache Filling:
8 oz. Bittersweet Chocolate, Finely Chopped
2/3 C. Heavy Cream
2 Tbsp. Butter, at Room Temperature
2 tsp. Bailey’s Irish cream or Irish whiskey

For the Bailey’s Buttercream Frosting:
½ C. Unsalted Butter, at Room Temperature
3-4 C. Confectioners’ Sugar, Sifted
4-8 Tbsp. Bailey’s Irish Cream

To make the cake, preheat the oven to 350° F. Grease and flour two 8-inch round cake pans. Line bottom of pan with parchment paper and grease and flour parchment paper.


Combine the stout and butter in a medium saucepan over medium heat. Bring to a simmer. Add the cocoa powder and whisk until smooth. Remove from the heat and allow to cool slightly.

In a large mixing bowl, combine the flour, sugar, baking soda and salt; set aside. In the bowl of an electric mixer fitted with the paddle attachment, beat together the eggs and sour cream to blend. Add the stout-butter mixture and beat just to combine. Mix in the dry ingredients on low speed just until incorporated. Divide the batter evenly between the cake pans. Bake until a toothpick inserted in the center comes out clean, approximately 20 - 25 minutes. Allow to cool in the pan for 10 minutes, then transfer to a wire rack to cool completely. Once the cakes have completely cooled, wrap in plastic and place the cake layers in the freezer for at least an hour. (This is done to make filling and frosting the cakes easier.)


To make the ganache filling, place the chocolate in a heatproof bowl. Heat the cream in a small saucepan until simmering, then pour it over the chocolate. Let sit for one minute and then whisk until smooth. If the chocolate is not completely melted, place the bowl over a double boiler or give it a very short burst in the microwave (15-20 seconds). Add the butter and Bailey’s/whiskey and stir until combined.

Set aside to let the ganache cool until it is thick enough to be spread (you can use the refrigerator to speed the cooling process, but be sure to stir every 10 minutes or so to ensure even cooling). Once the ganache has reached the correct consistency, spread it over the bottom cake layer. Top the ganache with the top cake layer.


To make the frosting, place the butter in the bowl of a stand mixer fitted with the paddle attachment, or use a hand mixer. Beat on medium-high speed until light and fluffy, about 2-3 minutes. Gradually add the powdered sugar until it is all incorporated. Mix in the Bailey’s until smooth. Add more if necessary until the frosting has reached a good consistency for piping or spreading. Frost the cake as desired.


Source: adapted from Annie’s Eats

Shepherd's Pie

My parents stayed with us on their way to Dallas. Since we would not be seeing my dad on his birthday, we decided to celebrate it that night. I decided to make one of the few Irish foods that I will actually eat.

This recipe is an amalgamation of several that I have found in various cookbooks and websites. The biggest changes that I have made are to use beef instead of lamb and to include Guinness.


Shepherd’s Pie

Filling:
3 Tbsp. Canola Oil
2 lbs. Ground Beef
Salt and Pepper
1 Medium Onion, Chopped
4 Carrots, Peeled and Diced
2 Tbsp. Parsley
1 tsp. Thyme
1 C. Guinness (or other Stout)
2 C. Chicken or Beef Stock
3 Tbsp. Flour

Topping:
2 lbs. Potatoes, Peeled and Cut into 1-inch pieces
½ C. Milk
2 Tbsp. Butter
½ C. Cheddar Cheese, Grated

1. In a large skillet over medium heat, warm the oil. Add the beef and cook for 5 to 7 minutes, or until browned (does not have to be fully cooked at this point). Drain the meat and season with salt and pepper.

I used baby carrots for this dish. Just make sure that there is approximately the same amount of carrots and onions.
2. Stir in the onion, carrots, parsley, and thyme, and cook, stirring occasionally, for 5 to 8 minutes, or until vegetables are soft. Add the broth and stout. Bring to a boil, scraping the browned bits from the bottom of the pan. Add the flour, reduce the heat to low and simmer, uncovered, stirring occasionally, for 20 to 25 minutes, or until the vegetables are tender and the sauce is thickened. Season again with salt and pepper.

3. Preheat oven to 425°F.

4. Meanwhile, in a large saucepan over medium heat, cook the potatoes in boiling salted water for 12 to 15 minutes, or until tender. Drain and mash. Add the milk and butter and stir until smooth.

5. Transfer the stew to a large casserole dish or 4 individual ovenproof casserole dishes. Spread the mashed potatoes over the meat mixture and bake for 10 to 12 minutes or until the mixture is hot. Preheat the broiler for just a few minutes and sprinkle the potatoes with the grated cheese, if using. Place the pie under the preheated broiler, 4 inches from the heat source, and broil for 1 to 2 minutes, or until the potatoes are lightly browned and the cheese is bubbling.