Pages

May 26, 2010

Doughnuts

Doughnuts have always been on my “to-do” list, but I was always a bit intimidated. After surviving making bagels, I figured that the time had come to take on the challenge.

A few helpful hints:

1)      Do not let the shaped doughnuts rise for more than the 1-1 ¼ hours. The first time that I made these, I used the theory of “the longer something has to rise, the bigger and airier it will be.” Apparently, this recipe has a rather short breakdown period. I let the doughnuts rise for about 2 ½ hours and they ended up being rather deflated. They tasted fine, but they were rather unattractive and flat.The second batch rose for only an hour and they were much prettier.

2)      If you are using plastic wrap to cover the shaped doughnuts as they rise, please make sure that it is generously greased. There is nothing as disheartening as getting ready to fry beautiful airy doughnuts, and to have the tops pull off and completely deflate when you pull the covering off.

The second, prettier batch.
Yeast Doughnuts

For the Doughnuts:
1-⅛ C. Whole Milk, Warm
¼ C. Sugar
2-¼ tsp. (One Package) Instant Or Active Dry Yeast
2 Large Eggs, Beaten
10 Tbsp. Unsalted Butter, Melted
4 C. All-Purpose Flour
¼ tsp. Salt
Canola Oil

For the Glaze:
3 C. Powdered Sugar
½ tsp. Salt
½ tsp. Vanilla
½ C. Cold Water Or Milk

To Make the Dough:


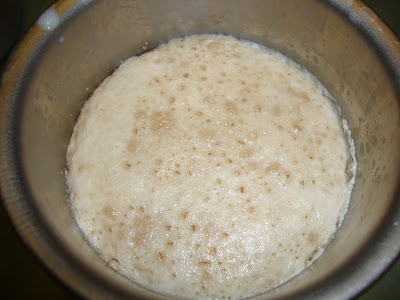
Make sure milk is nice and warm, but not overly hot (105-115°F).Add sugar to milk. Stir to dissolve. Add yeast into a small bowl. Pour milk/sugar mixture over yeast. Stir gently, then let sit for 10 minutes.
This should be done with the dough hook attachment, not the whisk. I realized this after I took the picture and didn't remember to get updated pictures.
 Melt butter in separate bowl until almost melted. Stir to finish melting so butter won’t be overly hot. Add beaten eggs to melted butter, stirring constantly to make sure that the eggs don't cook. Add the egg/butter mixture to the bowl of an electric mixer fitted with the dough hook.

The yeast gets all foamy and happy after 10 minutes.
 With the mixer on 3 (if you have a KitchenAid) or medium-low speed, pour in the yeast mixture. Allow the dough hook to stir this mixture for a couple of minutes, making sure that it is thoroughly combined.

With the mixer still going, add helpings of the flour mixture in 1/4 to 1/2 cup increments until all the flour is gone. Stop the mixer, scrape the bowl, and then turn the mixer on the same speed for five whole minutes.

After five minutes of kneading, you should have a soft, but not overly sticky dough.
 After five minutes, stop the mixer and scrape the bottom of the bowl. Turn on the mixer for 30 seconds. Turn off the mixer and allow the dough to sit in the bowl undisturbed for 10 minutes.

After 10 minutes, transfer dough to a lightly oiled bowl. Toss the dough to coat, and then cover the bowl with plastic wrap and place straight in the fridge. Refrigerate dough for at least 8 hours, or overnight.

To Make the Doughnuts:

The next day, the dough is reminiscent of airy sugar cookie dough.
Remove bowl from fridge and turn out dough onto a lightly floured surface. Roll out to 1/4 to 1/3-inch thickness.
If you do not have a 3-inch or 1-inch round cutter, feel free to use other shapes. The back of a piping tip is also a good substitute. 
Using a 3-inch cutter, cut as many rounds as you can, then roll out remaining dough and cut as much as you can, etc. Cut holes out of each round using a 1 1/2-inch cutter.
Before rising, the doughnuts look similar to sugar cookie cut-outs.
Place both doughnuts and holes on a floured baking sheet. Cover with large tea towel or greased plastic wrap and place in a warm place in your kitchen.
If not allowed to rise for too long, the doughnuts should be nice and fluffy prior to frying.
 Allow doughnuts to rise undisturbed for at least 1 hour; 1 hour 15 minutes if necessary. Doughnuts should be visibly puffier and appear to be airy.

To Fry the Doughnuts:

Heat plenty of canola oil in a large pot until the temperature reaches 375- 380°F —do not let it get hotter than 380! 375 is ideal; keep the thermometer in the pan to continually monitor.


One to two at a time, gently grab doughnuts and ease them into the hot oil. Allow them to cook 1 minute on each side; they will brown very quickly. Remove doughnuts from the oil with a slotted spoon, allowing all oil to drip off.


Place doughnuts immediately on several layers of paper towels. Count to five, then flip it over onto a clean part of the paper towels. Count to five, then flip it over again; the purpose, obviously, is to drain as much grease as possible before it soaks into the doughnut. Repeat with remaining doughnuts and holes. The holes will cook more quickly than the doughnuts; about 30 seconds per side. Allow doughnuts to slightly cool.

To Glaze:

Mix all glaze ingredients in a bowl until completely smooth. One by one, dip doughnuts into the glaze until halfway submerged. (Note: completely submerge doughnut holes, and then remove with slotted spoon). Remove from glaze, then turn right side up on a cooling rack over a cookie sheet (to catch dripping glaze). Serve warm if possible, or room temperature.


Sandwich Bread

Once I saw this recipe, I knew that I had to make it. It makes a wonderful tall loaf of bread that is soft, but sturdy enough to hold up a sandwich. After getting the hang of the original white bread, I started to experiment by adding a tablespoon of garlic powder and oregano to the dough to get an “Italian” version.

We have not bought bread since I discovered this recipe. I’ve been making two to three loaves a week.


American Sandwich Bread

3 ¾ C. All-Purpose Flour
2 tsp. Salt
1 C. Warm Whole Milk (about 110°)
1/3 C. Warm Water (about 110°)
2 tbsp. Unsalted Butter, Melted
3 Tbsp. Honey
1 Envelope (about 2 ¼ tsp.) Instant Yeast

Adjust an oven rack to the lowest position and heat the oven to 200°. Once the oven temperature reaches 200°, maintain the heat for 10 minutes, then turn off the oven.


Mix 3 ½ cups of the flour and the salt in the bowl of a stand mixer fitted with the dough hook. Mix the milk, water, butter, honey and yeast in a 4-cup liquid measuring cup. Turn the machine to low and slowly add the liquid. When the dough comes together, increase the speed to medium and mix until the dough is smooth and satiny, stopping the machine two or three times to scrape dough from the hook, if necessary, about 10 minutes. (After 5 minutes of kneading, if the dough is still sticking to the sides of the bowl, add flour 1 tablespoon at a time and up to ¼ cup total, until the dough is no longer sticky.) Turn the dough onto a lightly floured work surface; knead to form a smooth, round ball, about 15 seconds.


Place the dough in a very lightly oiled large bowl, rubbing the dough around the bowl to coat lightly. Cover the bowl with plastic wrap and place in the warmed oven until the dough has doubled in size, about 40-50 minutes.


On a floured work surface, gently press the dough into a rectangle 1 inch thick and no longer than 9 inches.


With a long side facing you, roll the dough firmly into a cylinder, pressing with your fingers to make sure the dough sticks to itself. Turn the dough seam-side up and pinch it closed.


Place the dough seam-side down in a greased 9×5-inch loaf pan and press it gently so it touches all four sides of the pan. Cover with greased plastic wrap; set aside in a warm spot until the dough almost doubles in size, 20-30 minutes.

Keep one oven rack at the lowest position and place the other at the middle position and heat the oven to 350°. Place an empty baking pan on the bottom rack. Bring two cups of water to boil in a small saucepan. Pour the boiling water into the empty pan on the bottom rack and set the loaf onto the middle rack. Bake until an instant-read thermometer inserted at an angle from the short end just above the pan rim into the center of the loaf reads 195°, 40-50 minutes. Remove the bread from the pan, transfer to a wire rack and cool to room temperature. Slice and serve.


Source: Baking Illustrated

May 25, 2010

Easter Baskets

I was in charge of dessert for Easter dinner, and I wanted to do something different. I had recently seen the butterfly cupcakes in Hello Cupcake! and it gave me the idea to make chocolate egg adornments. I had also recently acquired molds for dessert shells that I was looking for an excuse to use. After much deliberation, I decided that peanut butter pie would be nice in the shells, like a large peanut butter cup. I had a horrible time trying to find a recipe for peanut butter pie that didn’t include whipped cream, so I altered Grandma Gator’s cream pie recipe. The end result seemed to be a hit – Tim’s Grandmother ate two!


Easter Baskets (Peanut Butter Pie in a Chocolate Shell)

Supplies Needed:
Dessert Shell Mold (My molds are two piece sets)
Wax Paper
Plastic Baggies
Roll of Paper Towels
Toothpicks
Offset Spatula
Chocolate Chips
Various Colored Candy Melts

Peanut Butter Pie “Grass”:
½ C. Sugar
1/3 C. Flour
¾ tsp. Salt
2 C. Milk
3 Egg Yolks
2 Tbsp. Butter
½ C. Peanut Butter
1 tsp. Vanilla
Green Food Coloring

To make the “Baskets”:

Melt 1 ½ cups of the chocolate chips in a double boiler or microwave until melted and over 105° on a candy thermometer. Stir in ½ cup of chips until the temperature enters the tempering range (88°-90° for dark chocolate and 86°-88° for milk chocolate).

Fill each outer mold 1/3 to 1/2 full with melted chocolate. Insert the inner mold and press into place. Lightly tap the molds to break up any air bubbles. Put the molds into the refrigerator or freezer until completely set.


Once set, remove the dishes from the molds (it may help to quickly run warm water over the bottom of the molds to loosen the dishes). Store in refrigerator.

To make the decorations:

Draw the handle template on a piece of paper. Cut out squares of wax paper large enough to fit each handle.

Place about 1 cup of chocolate chips in a plastic bag. Microwave in 10 second intervals, unsealed, massaging the chips in between, until the chocolate is completely melted and no lumps remain. Press out the excess air in the bag and seal. Push the mixture down to one corner of the bag and snip off a very small corner. Trace the outline of the handle template.


Fill in the outline, being generous, so that it will spread all the way to the sides.


Using an offset spatula or a toothpick spread and smooth the chocolate.

The chocolate sets quickly, so each handle should be on a separate piece of wax paper, in order to prevent breaking and cracking.  
Wrap the handles around a roll of paper towels that is the approximate width of the baskets. Put into the refrigerator or freezer until completely set.

Repeat this process until you have enough handles for all your baskets.
While the handles are setting, draw an egg template on a piece of paper. Cut a large sheet of wax paper for the eggs. Place about 1/2 cup of each colored candy melts in separate plastic bags. Microwave in 10 second intervals, unsealed, massaging the candy melts in between, until the candy is completely melted and no lumps remain. Press out the excess air in the bag and seal. Push the mixture down to one corner of the bag and snip off a very small corner. Trace the outline of the egg template with the various colored melted candy. Use the same bag of colored candy melts to fill in the outline. Be generous, so that it will spread all the way to the sides. Using an offset spatula or a toothpick spread and smooth the candy.

The melted candy will begin to cool and harden as you work. If it becomes too stiff to work with, microwave for 10 more seconds until melted again. This step is very important – if you think you might need to reheat the candy, definitely do it. You will save yourself a lot of messed up eggs by keeping the candy melted.
Repeat this process with more candy melts until you have enough eggs for all your baskets. Let set completely.


Once the eggs have set, use the other colored candy melts to decorate the eggs. Let set completely.

To make the filling:


Mix sugar, flour, and salt. Add enough milk to make a paste, and then add the egg yolks. Pour on the remaining milk and cook in a double boiler for 15 minutes, stirring constantly until thick and smooth. Remove from heat and stir in the butter, peanut butter, vanilla, and food coloring.

I forgot a coupler, so I had to cheat by pushing the decorating tip into the bottom of the pastry bag.
Allow to cool slightly and transfer to a pastry bag fitted with a star tip. Pipe into the prepared chocolate baskets, and then garnish with the chocolate handles and Easter eggs.


Serve immediately or store in refrigerator.